Cloud Resume Challenge Step-by-Step Tutorial Guide
We will build a Serverless Website using AWS

Welcome to my blog !
We will build a Serverless Website using AWS and here is the Cloud Resume Challenge Link
I have broken down the whole project into 9 Days plan so that, it is easier to grasp and follow-through
Our end Product of the Project is https://ronitbanerjee.xyz
And here is the Codebase in GitHub Repository
And also, if you want to go through my #100DaysOfCloud journey, Here is the link
[DAY - 1 ]

Setup IAM User in AWS
Introduction
I made a IAM user through my Root account in AWS. In addition, I stored the credentials in aws-vault which helps to execute commands faster and user-specific.
Use Case
- Provides Separate space to work in
- Privacy
- Multi-user support
- SSH access from desktop terminal
- Root-user control
Cloud Research
- Searched for "IAM" in AWS dashboard
Setup MFA (Multi Factor Authentication) for root user [Mandatory]
- Downloaded Google Authenticator app from playstore in my Android Device
- Signed in with the details provided by AWS MFA portal
Clicked on Reveal Pin to get Token (refreshes every 30 second)
Create User
- Added permissions (existing policies) • With Full access and administration access ○ IAM ○ IAM User ○ IAM UserChangePassword ○ API Gateway ○ Lambda ○ CloudFormation
Displays the Credentials (Download the .csv file or copy and store the credentials in a safe location, This is will not be displayed again)
- Incase you forgot to store the credentials, you need to create Access Key again and delete the previous one (Maximum limit of Access Key is 2)

- Setting Credentials using AWS-Vault :
aws-vault add [user-id]
- Asks for access_key_id and secret_access_key
- Copy and paste the credentials of the IAM user created
- Checks if the Credentials are stored correctly (Display Details of the Profile)
aws sts get-caller-identity
- You can also list the users and store more credentials with different user-id
aws-vault list             --> (Lists user)
aws-vault add [user-id]    --> (Adds more user)
Social Proof

[DAY - 2]
Deploy S3 using AWS SAM
Introduction
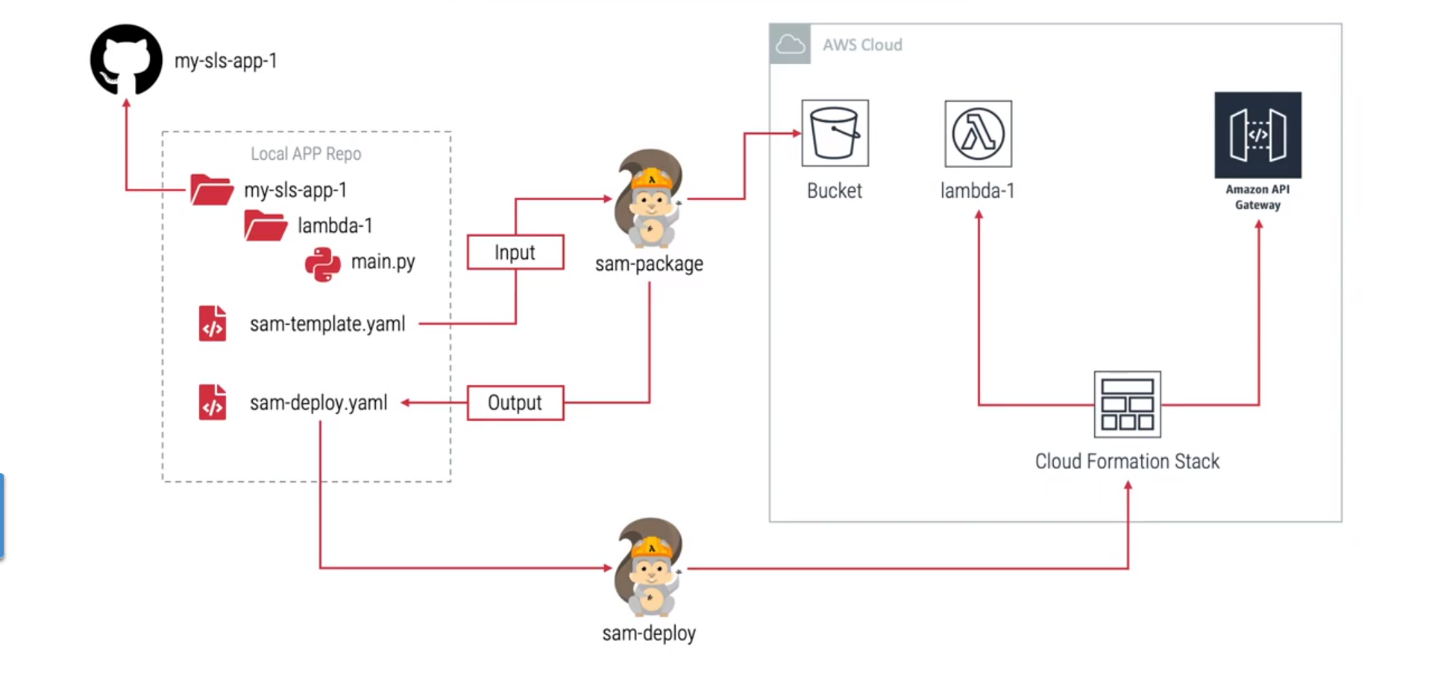
Deployed an S3 Bucket and CloudFormation Stacks using the aws-sam-cli
Use Case
- To store and retrieve any amount of data at any time from anywhere
- Object storage service that offers industry-leading scalability, data availability, security, and performance
Cloud Research
- Install aws-sam-cli (using Homebrew in Mac)
brew tap aws/tap brew install aws-sam-cli - Set IAM user permissions (existing policies) • With Full access and administration access ○ IAM ○ IAM User ○ IAM UserChangePassword ○ API Gateway ○ Lambda ○ CloudFormation
- Initialise the SAM in the directory of your choice (Your project folder in most case)
sam init - My Arguments are as follows (Choose arguments according to your needs):
Which template source would you like to use?
    1 - AWS Quick Start Templates
    2 - Custom Template Location
Choice: 1

Choose an AWS Quick Start application template
    1 - Hello World Example
    2 - Multi-step workflow
    3 - Serverless API
    4 - Scheduled task
    5 - Standalone function
    6 - Data processing
    7 - Infrastructure event management
    8 - Machine Learning
Template: 1

Use the most popular runtime and package type? (Python and zip) [y/N]: n

Which runtime would you like to use?
    1 - dotnet6
    2 - dotnet5.0
    3 - dotnetcore3.1
    4 - go1.x
    5 - graalvm.java11 (provided.al2)
    6 - graalvm.java17 (provided.al2)
    7 - java11
    8 - java8.al2
    9 - java8
    10 - nodejs16.x
    11 - nodejs14.x
    12 - nodejs12.x
    13 - python3.9
    14 - python3.8
    15 - python3.7
    16 - python3.6
    17 - ruby2.7
    18 - rust (provided.al2)
Runtime: 4

What package type would you like to use?
    1 - Zip
    2 - Image
Package type: 1

Based on your selections, the only dependency manager available is mod.
We will proceed copying the template using mod.

Would you like to enable X-Ray tracing on the function(s) in your application?  [y/N]: n

Project name [sam-app]: demo-sam-app

Cloning from https://github.com/aws/aws-sam-cli-app-templates (process may take a moment)

    -----------------------
    Generating application:
    -----------------------
    Name: demo-sam-app
    Runtime: go1.x
    Architectures: x86_64
    Dependency Manager: mod
    Application Template: hello-world
    Output Directory: .

    Next steps can be found in the README file at ./demo-sam-app/README.md
Enter the newly made folder by :
cd demo-sam-appMake a build :
sam buildGo to AWS website and click on S3
- Create Bucket with a random name. For reference :

- Copy the name of the Bucket
Change the default bucket name with the copied name in "samconfig.toml" file. For reference, In line no. 6 :

Final Deployment :
aws-vault exec [user-id] --no-session -- sam deploy --guided
Note: --guided is not required after one iteration of deployment, configurations are stored while first deployment is done.
- Deployment Arguments :
Configuring SAM deploy
======================

    Looking for config file [samconfig.toml] :  Not found

    Setting default arguments for 'sam deploy'
    =========================================
    Stack Name [sam-app]: demo-stack
    AWS Region [ap-south-1]:
    #Shows you resources changes to be deployed and require a 'Y' to initiate deploy
    Confirm changes before deploy [y/N]: n
    #SAM needs permission to be able to create roles to connect to the resources in your template
    Allow SAM CLI IAM role creation [Y/n]: y
    #Preserves the state of previously provisioned resources when an operation fails
    Disable rollback [y/N]: n
    HelloWorldFunction may not have authorization defined, Is this okay? [y/N]: y
    Save arguments to configuration file [Y/n]: y
    SAM configuration file [samconfig.toml]:
    SAM configuration environment [default]:
- After few minutes, "Successfully created/updated stack - demo-stack in us-east-1" is displayed in the Terminal.
Social Proof

[DAY - 3]
Introduction to Infrastructure as a Code (IaaC) & Deploying HTML-CSS with AWS SDK
Introduction
Learnt about IaaC and here are the important points that should be mentioned
What is IaaC? It is basically having your cloud configuration or infrastructure to find a source control like GitHub.
Benefits :
- Team Collaboration
- Disaster Recovery (Chaos Engineering)
- History of Changes (Version Controlling)
Tools :
- CloudFormation (AWS specific)
- AWS SAM (AWS Specific)
- Terraform (Works with every Cloud service)
- Pulumi (Not very popular, but similar to Terraform)
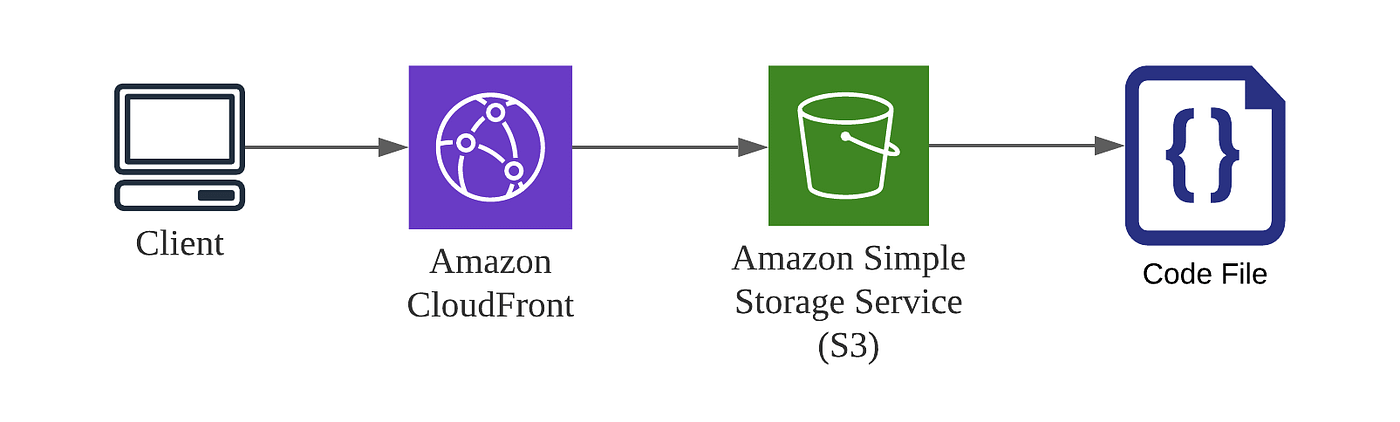
Apart from that, I deployed my sample resume site using AWS SDK
Use Case
- Deployment
- Public Visibility
Cloud Research
Here are the steps to deploy the HTML website in AWS :
To know the previous steps on How to Deploy S3 using AWS SAM, Click on Day-2
Add the following Snippet to the
template.yamlbelow the resource tag (This creates a bucket named "ronit-demo-site", whose static website hosting is set to "Enabled")MyWebsite: Type: AWS::S3::Bucket Properties: AccessControl: PublicRead WebsiteConfiguration: IndexDocument: index.html BucketName: ronit-demo-siteNow make a folder for the HTML-CSS file and create the "index.html" inside that folder
Then, for a bit of automation, I updated the
MakeFileto avoid repetition of CLI commands (Simply makes our lives easier, So why not?... Hehe)
Here is the snippet for the "MakeFile"
.PHONY: build

build:
    sam build

deploy-infra:
    sam build && aws-vault exec ronitblenz --no-session -- sam deploy

deploy-site:
    aws-vault exec ronitblenz --no-session -- aws s3 sync ./resume-site s3://ronit-demo-site
- Now run command
make deploy-site
It uploads the .html file in the S3 Bucket
But here is the catch, A case-study while clicking on the public S3 link :
- Before uploading the .html file, it displayed
Error 404 Not FoundIt means, file does not exist!

- After uploading the .html file, it displayed
Error 403 ForbiddenIt means, file exists but not accessible, permission not granted

- Now I had to add Bucket Policies to the
template.yamlfile below MyWebsite tag (This helps to make all files in S3 Bucket accessible to the link) Here is the snippet to be added :
BucketPolicy:
    Type: AWS::S3::BucketPolicyProperties:
      PolicyDocument:
        Id: MyPolicyVersion: 2012-10-17Statement:
          - Sid: PublicReadForGetBucketObjectsEffect: AllowPrincipal: "*"Action: "s3:GetObject"Resource: !Join- ""- - "arn:aws:s3:::"- !RefMyWebsite- /*Bucket: !Ref MyWebsite
- Now run command
make deploy-infra
AND HOLA! You have successfully deployed your site on AWS.
Social Proof

[DAY - 4]

Deploying and Configuring Cloudfront from S3 Bucket
Introduction
Customizing the Public link
Use Case
- SSL Certificate Implementation
- Custom Domain
- Shortens the time and the link itself
Cloud Research
Here are the steps for Deploying and Configuring Cloudfront from S3 Bucket :
Check the previous day documentations for the steps done till now regarding IAM, S3, CloudFormation
Add the following Snippet to the
template.yamlbelow the resource tag (This creates a CDN in CloudFront)MyDistribution: Type: "AWS::CloudFront::Distribution" Properties: DistributionConfig: DefaultCacheBehavior: ViewerProtocolPolicy: allow-all TargetOriginId: ronit-demo-site.s3-us-east-1.amazonaws.com DefaultTTL: 0 MinTTL: 0 MaxTTL: 0 ForwardedValues: QueryString: false Origins: - DomainName: ronit-demo-site.s3-us-east-1.amazonaws.com Id: ronit-demo-site.s3-us-east-1.amazonaws.com CustomOriginConfig: OriginProtocolPolicy: match-viewer Enabled: "true" DefaultRootObject: index.htmlGo to your IAM User Permissions in AWS Dashboard and give the permission
CloudFrontFullAccess(Else, it will not create a Distribution through CLI and throw an error)Now run command
make deploy-infra
AND HOLA! You have successfully made a CloudFront Link for your site.
Social Proof

[DAY - 5]
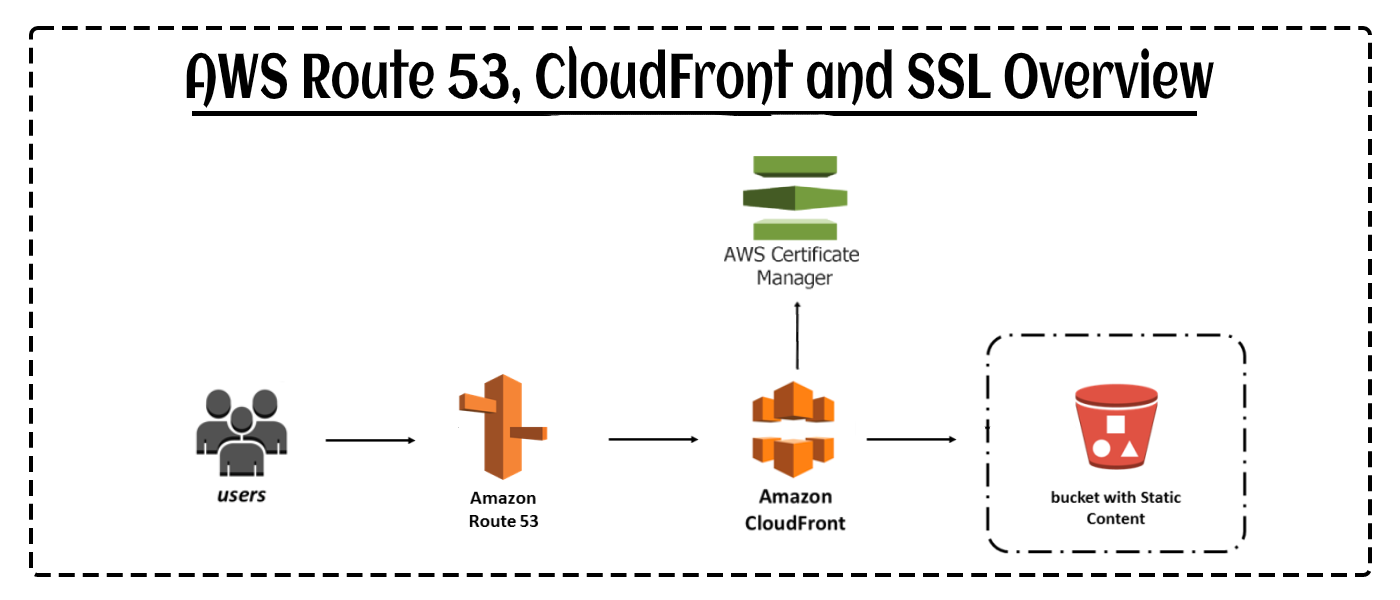
Configure AWS Route 53, CloudFront and SSL Certificate
Introduction
We will learn how to deploy a serverless site from CloudFront using Route 53 and also add SSL Certficate using ACM (Amazon Certificate Manager)
Use Case
- HTTPS (Secured Protocol with SSL Certificate)
- Custom Domain
Cloud Research
Here are the steps for Configuring AWS Route 53, CloudFront and SSL Certificate :
Check the previous day documentations for the steps done till now regarding IAM, S3, CloudFormation and CloudFront
Add the following Snippet to the
template.yamlbelow the resource tag (This creates a Record in Route 53)MyRoute53Record: Type: "AWS::Route53::RecordSetGroup" Properties: HostedZoneId: Z04723851ZV06PPOSS6A2 # TODO: Don't hardcode me RecordSets: - Name: ronitbanerjee.xyz # TODO: Don't hardcode me Type: A AliasTarget: HostedZoneId: Z2FDTNDATAQYW2 # This is CloudFront HostedZoneId (Constant) DNSName: !GetAtt MyDistribution.DomainNameFor instance, My domain provider is ".xyz"
- Login to your "Manage Domain" page in your Domain Provider's dashboard
- Copy the Name Servers from Hosted Zones in Route53 and paste it in the Custom Name Servers of Domain Provider's dashboard as shown below
From Route53:

To Domain Management Page:

Please wait for few hours, it takes time for DNS Propagation
Now it will definitely throw an error, because the process is not completed yet. If you see this screen mentioned below, the above steps are followed correctly

- Now, ACM (Amazon Certificate Manager) will come into picture
- Go to ACM in AWS Dashboard
- Click on "Request" for a certificate and mention your domain name
(For Example:
ronitbanerjee.xyzin my case) Now verify via DNS Method
- An option to create CNAME automatically will be present
- Click on that and wait for 5 minutes
- This will complete the verification process for the SSL Certificate
Go to your IAM User Permissions in AWS Dashboard and give the permission
AWSCertificateManagerFullAccess(Else, it will not make the required changes for HTTPS and throw an error)Add the following Snippet to the
template.yamlin the MyCertificate tag and Update MyDistribution tag (This adds the Certificate to your Custom Domain)MyCertificate: Type: AWS::CertificateManager::Certificate Properties: DomainName: ronitbanerjee.xyz # TODO: Don't hardcode me ValidationMethod: DNS # MyDistribution: # Properties: # DistributionConfig: ViewerCertificate: AcmCertificateArn: !Ref MyCertificate SslSupportMethod: sni-onlyNow run command
make deploy-infra- Lastly, add "Alternate Domain" as
ronitbanerjee.xyzin the CloudFront CDN.
AND HOLA! Custom Domain Site is Deployed with HTTPS Protocol
Social Proof

[DAY - 6]
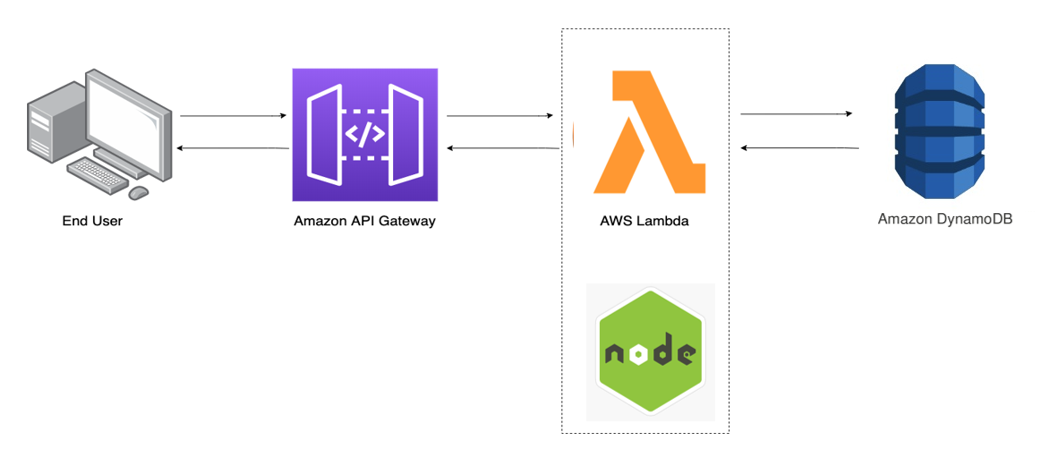
Disable CORS using API Gateway and AWS Lambda for Calling API using JavaScript
Introduction
CORS is Cross-Origin Resource Sharing
We will actually disable the CORS here (Otherwise, it will throw CORS Error) Then, Setup the Back-End of the Web application
Use Case
- API Calls
- Add Dynamic Element to the Front-End
Cloud Research
Here are the steps for Disabling CORS using API Gateway and AWS Lambda for Calling API using JavaScript :
Check the previous day documentations for the steps done till now regarding IAM, S3, CloudFormation, CloudFront and Certificate Manager
Open the
main.gofileAdd the following Snippet to the
APIGateWayProxyResponse: (This adds additional Header property which will return the Headers from my API Request and disable the CORS) Note: A small change to the body is also made here!Headers: map[string]string{ "Access-Control-Allow-Origin": "*", "Access-Control-Allow-Methods": "*", "Access-Control-Allow-Headers": "*", }, Body: fmt.Sprintf("{ \"count\": \"2\" }"), StatusCode: 200,Run command
make deploy-infraand check the following page address in AWS
There is an
Invoke URL. Copy and Paste it in a browser window to check if it is returning correct values

You can also check it through Terminal using "curl command"

- Now add the JavaScript Code in the
index.htmlfile (This script fetches the Counter data through API)
<script>
    fetch('https://lyurpfjw7f.execute-api.us-east-1.amazonaws.com/Prod/hello/')
        .then(response => response.json())
        .then((data) => {
            document.getElementById('replaceme').innerText = data.count
        })
</script>
Also add this to the HTML for printing the values on page
<div class="d-flex flex-row-reverse"> <div class="p2">View Count : <span id="replaceme"> </span></div> <div id="counter" class="bg-primary text-white p2"></div> </div>- Run command
make deploy-siteand check the deployed site (In my case, it ishttps://ronitbanerjee.xyz)
AND The Back-End is ready to fetch data from the Database through API !
Social Proof

[DAY - 7]
Setup DynamoDB using AWS SAM
Introduction
What is DynamoDB?
- It is a NoSQL proprietary Database by AWS
- It can sustain large amount of traffic and highly scalable (It's not relevant in our case though)
- It is also Schema-less, So we don't need to define our data-types upfront
Here, we will setup the DynamoDB and change the configuration in the infrastructure
Use Case
- Database
- API calls
Cloud Research
Here are the steps for Setting up DynamoDB using AWS SAM :
Check the previous day documentations for the steps done till now regarding IAM, S3, CloudFormation, CloudFront, Certificate Manager and API GateWay
Add
AmazonDynamoDBFullAccessPermission to the IAM user for executing the later tasksAdd the following Snippet to the
template.yamlbelow Resource tab: (This adds a Table named "ronit-cloud-resume" in DynamoDB)DynamoDBTable: Type: AWS::DynamoDB::Table Properties: TableName: ronit-cloud-resume BillingMode: PAY_PER_REQUEST AttributeDefinitions: - AttributeName: "ID" AttributeType: "S" KeySchema: - AttributeName: "ID" KeyType: "HASH"Run command
make deploy-infraand check the tables page in AWS DynamoDB Dashboard, and Click on the table we created viatemplate.yamlClick on "Explore Items" and Create an item named
example
So, a Sample Table and Item is made in DynamoDB
There are two types of Architectural Patterns -->
1. **Monolithic Function** <br>(Putting all code in single Lambda Deployment)<br><br>
2. **Single Purposed Function** <br>(Each Lambda per Functionality)<br>
We are using Single Purposed Function for our case
- We will update the Lambda Functions in the
template.yamlwith the following snippet: (It createsgetandputfuntions, deleting the existingHelloWorldFunction
  GetFunction:
    Type: AWS::Serverless::Function
    Properties:
      CodeUri: get-function/
      Handler: get-function
      Runtime: go1.x
      Architectures:
        - x86_64
      Events:
        CatchAll:
          Type: Api
          Properties:
            Path: /get
            Method: GET
  PutFunction:
    Type: AWS::Serverless::Function
    Properties:
      CodeUri: put-function/
      Handler: put-function
      Runtime: go1.x
      Architectures:
        - x86_64
      Events:
        CatchAll:
          Type: Api
          Properties:
            Path: /put
            Method: GET
We also need to replace the
Hello-worldfolder withget-functionandput-functionfoldersInside those folders, modify the
go.modfor changing the function name into respective folder namesAnd lastly, Change the
invoke URLin JavaScript snippet ofindex.htmlby replacinghello/withget, as mentioned below :
<script>
    fetch('https://lyurpfjw7f.execute-api.us-east-1.amazonaws.com/Prod/get')
        .then(response => response.json())
        .then((data) => {
            document.getElementById('replaceme').innerText = data.count
        })
</script>
- Run command
make deploy-siteandmake deploy-infrato make changes to the stack - Check if the invoke link is returning { "count": "2" } in the Browser Window

AND The DynamoDB is ready to store data over it and turn it Dynamic !
Social Proof

Representation of the Stages in the API GateWay after Deployment
[DAY - 8]
Store and Get Data from DynamoDB
Introduction
What is DynamoDB?
- It is a NoSQL proprietary Database by AWS
- It can sustain large amount of traffic and highly scalable (It's not relevant in our case though)
- It is also Schema-less, So we don't need to define our data-types upfront
Here, we will connect the database to the backend of the site while configuring the Lambda functions. This will enable the website to show the Visitor Count.
Use Case
- Database
- API calls
Cloud Research
Here are the steps for Storing and Getting Data from DynamoDB :
- Check the previous day documentations for the steps done till now regarding IAM, S3, CloudFormation, CloudFront, Certificate Manager and API GateWay
1. PUT FUNCTION
- Firstly, Modify the
go.mod,go.sumandmain.gofiles
go.mod -->
require github.com/aws/aws-lambda-go v1.23.0
require github.com/aws/aws-sdk-go v1.38.17
require github.com/cpuguy83/go-md2man/v2 v2.0.0
replace gopkg.in/yaml.v2 => gopkg.in/yaml.v2 v2.2.8
module put-function
go 1.16
go.sum -->
github.com/BurntSushi/toml v0.3.1/go.mod h1:xHWCNGjB5oqiDr8zfno3MHue2Ht5sIBksp03qcyfWMU=
github.com/appleboy/go-fcm v0.1.5 h1:fKbcZf/7vwGsvDkcop8a+kCHnK+tt4wXX0X7uEzwI6E=
github.com/appleboy/go-fcm v0.1.5/go.mod h1:MSxZ4LqGRsnywOjnlXJXMqbjZrG4vf+0oHitfC9HRH0=
github.com/aws/aws-lambda-go v1.23.0 h1:Vjwow5COkFJp7GePkk9kjAo/DyX36b7wVPKwseQZbRo=
github.com/aws/aws-lambda-go v1.23.0/go.mod h1:jJmlefzPfGnckuHdXX7/80O3BvUUi12XOkbv4w9SGLU=
github.com/aws/aws-sdk-go v1.38.17 h1:1OfcfEtNrphUZYa+J0U35/1hxePbb3ASSQWdFS7L0Hs=
github.com/aws/aws-sdk-go v1.38.17/go.mod h1:hcU610XS61/+aQV88ixoOzUoG7v3b31pl2zKMmprdro=
github.com/cpuguy83/go-md2man/v2 v2.0.0-20190314233015-f79a8a8ca69d/go.mod h1:maD7wRr/U5Z6m/iR4s+kqSMx2CaBsrgA7czyZG/E6dU=
github.com/cpuguy83/go-md2man/v2 v2.0.0/go.mod h1:maD7wRr/U5Z6m/iR4s+kqSMx2CaBsrgA7czyZG/E6dU=
github.com/davecgh/go-spew v1.1.0/go.mod h1:J7Y8YcW2NihsgmVo/mv3lAwl/skON4iLHjSsI+c5H38=
github.com/davecgh/go-spew v1.1.1 h1:vj9j/u1bqnvCEfJOwUhtlOARqs3+rkHYY13jYWTU97c=
github.com/davecgh/go-spew v1.1.1/go.mod h1:J7Y8YcW2NihsgmVo/mv3lAwl/skON4iLHjSsI+c5H38=
github.com/dgrijalva/jwt-go v3.2.0+incompatible h1:7qlOGliEKZXTDg6OTjfoBKDXWrumCAMpl/TFQ4/5kLM=
github.com/dgrijalva/jwt-go v3.2.0+incompatible/go.mod h1:E3ru+11k8xSBh+hMPgOLZmtrrCbhqsmaPHjLKYnJCaQ=
github.com/go-test/deep v1.0.4 h1:u2CU3YKy9I2pmu9pX0eq50wCgjfGIt539SqR7FbHiho=
github.com/go-test/deep v1.0.4/go.mod h1:wGDj63lr65AM2AQyKZd/NYHGb0R+1RLqB8NKt3aSFNA=
github.com/gorilla/websocket v1.4.2 h1:+/TMaTYc4QFitKJxsQ7Yye35DkWvkdLcvGKqM+x0Ufc=
github.com/gorilla/websocket v1.4.2/go.mod h1:YR8l580nyteQvAITg2hZ9XVh4b55+EU/adAjf1fMHhE=
github.com/hashicorp/go-version v1.3.0 h1:McDWVJIU/y+u1BRV06dPaLfLCaT7fUTJLp5r04x7iNw=
github.com/hashicorp/go-version v1.3.0/go.mod h1:fltr4n8CU8Ke44wwGCBoEymUuxUHl09ZGVZPK5anwXA=
github.com/jmespath/go-jmespath v0.4.0 h1:BEgLn5cpjn8UN1mAw4NjwDrS35OdebyEtFe+9YPoQUg=
github.com/jmespath/go-jmespath v0.4.0/go.mod h1:T8mJZnbsbmF+m6zOOFylbeCJqk5+pHWvzYPziyZiYoo=
github.com/jmespath/go-jmespath/internal/testify v1.5.1 h1:shLQSRRSCCPj3f2gpwzGwWFoC7ycTf1rcQZHOlsJ6N8=
github.com/jmespath/go-jmespath/internal/testify v1.5.1/go.mod h1:L3OGu8Wl2/fWfCI6z80xFu9LTZmf1ZRjMHUOPmWr69U=
github.com/moemoe89/go-localization v1.0.0 h1:EcBH2ap/nS28jbnJ5sayGXfSKbV8KIpIfgpYPhQAnsc=
github.com/moemoe89/go-localization v1.0.0/go.mod h1:kZuSPnxZ2HcVC9SsShfVpHs+Kbx/KgeUP15jx8VgKG8=
github.com/pkg/errors v0.8.0/go.mod h1:bwawxfHBFNV+L2hUp1rHADufV3IMtnDRdf1r5NINEl0=
github.com/pkg/errors v0.9.1 h1:FEBLx1zS214owpjy7qsBeixbURkuhQAwrK5UwLGTwt4=
github.com/pkg/errors v0.9.1/go.mod h1:bwawxfHBFNV+L2hUp1rHADufV3IMtnDRdf1r5NINEl0=
github.com/pmezard/go-difflib v1.0.0 h1:4DBwDE0NGyQoBHbLQYPwSUPoCMWR5BEzIk/f1lZbAQM=
github.com/pmezard/go-difflib v1.0.0/go.mod h1:iKH77koFhYxTK1pcRnkKkqfTogsbg7gZNVY4sRDYZ/4=
github.com/russross/blackfriday/v2 v2.0.1/go.mod h1:+Rmxgy9KzJVeS9/2gXHxylqXiyQDYRxCVz55jmeOWTM=
github.com/satori/go.uuid v1.2.0 h1:0uYX9dsZ2yD7q2RtLRtPSdGDWzjeM3TbMJP9utgA0ww=
github.com/satori/go.uuid v1.2.0/go.mod h1:dA0hQrYB0VpLJoorglMZABFdXlWrHn1NEOzdhQKdks0=
github.com/shurcooL/sanitized_anchor_name v1.0.0/go.mod h1:1NzhyTcUVG4SuEtjjoZeVRXNmyL/1OwPU0+IJeTBvfc=
github.com/slack-go/slack v0.8.2 h1:D7jNu0AInBfdQ4QyKPtVSp+ZxQes3EzWW17RZ/va4JE=
github.com/slack-go/slack v0.8.2/go.mod h1:FGqNzJBmxIsZURAxh2a8D21AnOVvvXZvGligs4npPUM=
github.com/stretchr/objx v0.1.0/go.mod h1:HFkY916IF+rwdDfMAkV7OtwuqBVzrE8GR6GFx+wExME=
github.com/stretchr/testify v1.2.2/go.mod h1:a8OnRcib4nhh0OaRAV+Yts87kKdq0PP7pXfy6kDkUVs=
github.com/stretchr/testify v1.6.1 h1:hDPOHmpOpP40lSULcqw7IrRb/u7w6RpDC9399XyoNd0=
github.com/stretchr/testify v1.6.1/go.mod h1:6Fq8oRcR53rry900zMqJjRRixrwX3KX962/h/Wwjteg=
github.com/urfave/cli/v2 v2.2.0/go.mod h1:SE9GqnLQmjVa0iPEY0f1w3ygNIYcIJ0OKPMoW2caLfQ=
golang.org/x/crypto v0.0.0-20190308221718-c2843e01d9a2/go.mod h1:djNgcEr1/C05ACkg1iLfiJU5Ep61QUkGW8qpdssI0+w=
golang.org/x/crypto v0.0.0-20200622213623-75b288015ac9/go.mod h1:LzIPMQfyMNhhGPhUkYOs5KpL4U8rLKemX1yGLhDgUto=
golang.org/x/net v0.0.0-20190404232315-eb5bcb51f2a3/go.mod h1:t9HGtf8HONx5eT2rtn7q6eTqICYqUVnKs3thJo3Qplg=
golang.org/x/net v0.0.0-20201110031124-69a78807bb2b h1:uwuIcX0g4Yl1NC5XAz37xsr2lTtcqevgzYNVt49waME=
golang.org/x/net v0.0.0-20201110031124-69a78807bb2b/go.mod h1:sp8m0HH+o8qH0wwXwYZr8TS3Oi6o0r6Gce1SSxlDquU=
golang.org/x/sys v0.0.0-20190215142949-d0b11bdaac8a/go.mod h1:STP8DvDyc/dI5b8T5hshtkjS+E42TnysNCUPdjciGhY=
golang.org/x/sys v0.0.0-20190412213103-97732733099d/go.mod h1:h1NjWce9XRLGQEsW7wpKNCjG9DtNlClVuFLEZdDNbEs=
golang.org/x/sys v0.0.0-20200930185726-fdedc70b468f/go.mod h1:h1NjWce9XRLGQEsW7wpKNCjG9DtNlClVuFLEZdDNbEs=
golang.org/x/text v0.3.0/go.mod h1:NqM8EUOU14njkJ3fqMW+pc6Ldnwhi/IjpwHt7yyuwOQ=
golang.org/x/text v0.3.3 h1:cokOdA+Jmi5PJGXLlLllQSgYigAEfHXJAERHVMaCc2k=
golang.org/x/text v0.3.3/go.mod h1:5Zoc/QRtKVWzQhOtBMvqHzDpF6irO9z98xDceosuGiQ=
golang.org/x/tools v0.0.0-20180917221912-90fa682c2a6e/go.mod h1:n7NCudcB/nEzxVGmLbDWY5pfWTLqBcC2KZ6jyYvM4mQ=
gopkg.in/check.v1 v0.0.0-20161208181325-20d25e280405 h1:yhCVgyC4o1eVCa2tZl7eS0r+SDo693bJlVdllGtEeKM=
gopkg.in/check.v1 v0.0.0-20161208181325-20d25e280405/go.mod h1:Co6ibVJAznAaIkqp8huTwlJQCZ016jof/cbN4VW5Yz0=
gopkg.in/yaml.v2 v2.2.2/go.mod h1:hI93XBmqTisBFMUTm0b8Fm+jr3Dg1NNxqwp+5A1VGuI=
gopkg.in/yaml.v2 v2.2.8 h1:obN1ZagJSUGI0Ek/LBmuj4SNLPfIny3KsKFopxRdj10=
gopkg.in/yaml.v2 v2.2.8/go.mod h1:hI93XBmqTisBFMUTm0b8Fm+jr3Dg1NNxqwp+5A1VGuI=
gopkg.in/yaml.v3 v3.0.0-20200313102051-9f266ea9e77c/go.mod h1:K4uyk7z7BCEPqu6E+C64Yfv1cQ7kz7rIZviUmN+EgEM=
gopkg.in/yaml.v3 v3.0.0-20200615113413-eeeca48fe776 h1:tQIYjPdBoyREyB9XMu+nnTclpTYkz2zFM+lzLJFO4gQ=
gopkg.in/yaml.v3 v3.0.0-20200615113413-eeeca48fe776/go.mod h1:K4uyk7z7BCEPqu6E+C64Yfv1cQ7kz7rIZviUmN+EgEM=
main.go -->
package main
import (
    "log"

    "github.com/aws/aws-lambda-go/events"
    "github.com/aws/aws-lambda-go/lambda"
    "github.com/aws/aws-sdk-go/aws"
    "github.com/aws/aws-sdk-go/aws/session"
    "github.com/aws/aws-sdk-go/service/dynamodb"
)
func handler(request events.APIGatewayProxyRequest) (events.APIGatewayProxyResponse, error) {

    sess := session.Must(session.NewSessionWithOptions(session.Options{
        SharedConfigState: session.SharedConfigEnable,
    }))
    svc := dynamodb.New(sess)
    input := &dynamodb.UpdateItemInput{
        TableName: aws.String("ronit-cloud-resume"),
        Key: map[string]*dynamodb.AttributeValue{
            "ID": {
                S: aws.String("visitors"),
            },
        },
        UpdateExpression: aws.String("ADD visitors :inc"),
        ExpressionAttributeValues: map[string]*dynamodb.AttributeValue{
            ":inc": {
                N: aws.String("1"),
            },
        },
    }
    _, err := svc.UpdateItem(input)
    if err != nil {
        log.Fatalf("Got error calling UpdateItem: %s", err)
    }
    return events.APIGatewayProxyResponse{
        Headers: map[string]string{
            "Access-Control-Allow-Origin":  "*",
            "Access-Control-Allow-Methods": "*",
            "Access-Control-Allow-Headers": "*",
        },
        StatusCode: 200,
    }, nil
}
func main() {
    lambda.Start(handler)
}
- Update the
PutFunctionintemplate.yaml:
  PutFunction:
    Type: AWS::Serverless::Function
    Properties:
      Policies:
        - DynamoDBCrudPolicy:
            TableName: ronit-cloud-resume
      CodeUri: put-function/
      Handler: put-function
      Runtime: go1.x
      Architectures:
        - x86_64
      Events:
        CatchAll:
          Type: Api
          Properties:
            Path: /put
            Method: GET
- Run command
make deploy-infraand check the tables page in AWS DynamoDB Dashboard, and Click on the table - Click on "Scan/Query Items" and write
visitorsin ID (Partition Key) Click on Run and check the visitor count like this :

2. GET FUNCTION
- As previously done, Modify the
go.mod,go.sumandmain.gofiles Note: go.mod and go.sum will be same for this case, just copy and paste the code from above
main.go -->
package main
import (
    "log"
    "fmt"
    "github.com/aws/aws-lambda-go/events"
    "github.com/aws/aws-lambda-go/lambda"
    "github.com/aws/aws-sdk-go/aws"
    "github.com/aws/aws-sdk-go/aws/session"
    "github.com/aws/aws-sdk-go/service/dynamodb"
    "github.com/aws/aws-sdk-go/service/dynamodb/dynamodbattribute"
)
func handler(request events.APIGatewayProxyRequest) (events.APIGatewayProxyResponse, error) {

    sess := session.Must(session.NewSessionWithOptions(session.Options{
        SharedConfigState: session.SharedConfigEnable,
    }))
    svc := dynamodb.New(sess)
    var input = &dynamodb.GetItemInput{
        TableName: aws.String("ronit-cloud-resume"),
        Key: map[string]*dynamodb.AttributeValue{
            "ID": {
                S: aws.String("visitors"),
            },
        },
    }
    queryOutput, err := svc.GetItem(input)
    type Count struct {
        ID       string `json:"ID"`
        Visitors string `json:"visitors"`
    }
    count := Count{}
    err = dynamodbattribute.UnmarshalMap(queryOutput.Item, &count)
    if err != nil {
        log.Fatalf("Got error calling UpdateItem: %s", err)
    }
    return events.APIGatewayProxyResponse{
        Headers: map[string]string{
            "Access-Control-Allow-Origin":  "*",
            "Access-Control-Allow-Methods": "*",
            "Access-Control-Allow-Headers": "*",
        },
        Body:       fmt.Sprintf("{ \"count\": \"%s\" }", count.Visitors),
        StatusCode: 200,
    }, nil
}
func main() {
    lambda.Start(handler)
}
- Update the
GetFunctionintemplate.yaml:
  GetFunction:
    Type: AWS::Serverless::Function
    Properties:
      Policies:
       - DynamoDBCrudPolicy:
            TableName: ronit-cloud-resume
      CodeUri: get-function/
      Handler: get-function
      Runtime: go1.x
      Architectures:
        - x86_64
      Events:
        CatchAll:
          Type: Api
          Properties:
            Path: /get
            Method: GET
- Now update the JavaScript in
index.htmlto exchange values with dynamodb and update the counter in Front-end :
<script>
    fetch('https://lyurpfjw7f.execute-api.us-east-1.amazonaws.com/Prod/put')
        .then(() => fetch('https://lyurpfjw7f.execute-api.us-east-1.amazonaws.com/Prod/get'))
        .then(response => response.json())
        .then((data) => {
            document.getElementById('replaceme').innerText = data.count
        })
</script>
Run command
make deploy-siteandmake deploy-infrato make changes to the stack and siteCheck if your Viewer Count is updating on your Website while refreshing everytime
AND The database is connected to the site !
Social Proof

Dynamic Counter added to the website which keeps track of the view counts on the website
[DAY - 9]
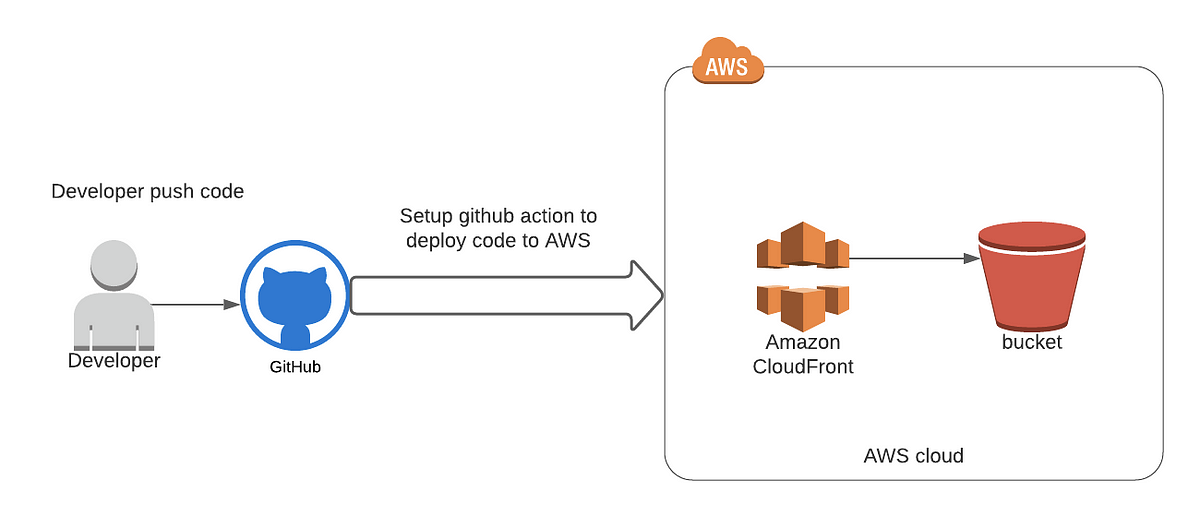
Unit Testing and CI/CD using GitHub Actions
Introduction
What is CI/CD?
- CI --> Continuous Integration
- CD --> Continuous Deployment
Here, we will setup the CI/CD using GitHub Actions and deploy infrastructure on AWS
Use Case
- Deployment
- Automation
Cloud Research
Here are the steps for Setting up GitHub Actions for CI/CD :
Check the previous day documentations for the steps done till now regarding IAM, S3, CloudFormation, CloudFront, Certificate Manager, API GateWay and DynamoDB
Create a
.githubdirectory and inside that, createworkflowsdirectoryCreate
main.yamlinside the above directory and use the following snippet:
(This configuration includes testing, build and deployment automations and Please make changes according to your naming conventions)``` name: main on: push env: GO_VERSION: 1.18.3
jobs: build-infra: runs-on: ubuntu-latest timeout-minutes: 2 steps:
  - uses: actions/checkout@v2
  - uses: actions/setup-go@v2.1.3
    with:
      go-version: ${{ env.GO_VERSION }}
  - name: test get-function
    run: cd get-function && go test -v ./ && cd ../../
  - name: test put-function
    run: cd put-function && go test -v ./ && cd ../../
build-and-deploy-infra: needs: build-infra runs-on: ubuntu-latest steps:
  - uses: actions/checkout@v2
  - uses: actions/setup-python@v2
  - uses: aws-actions/setup-sam@v1
  - uses: aws-actions/configure-aws-credentials@v1
    with:
      aws-access-key-id: ${{ secrets.AWS_ACCESS_KEY_ID }}
      aws-secret-access-key: ${{ secrets.AWS_SECRET_ACCESS_KEY }}
      aws-region: us-east-1
  - run: sam build
    working-directory: ./
  - run: sam deploy --no-confirm-changeset --no-fail-on-empty-changeset
    working-directory: ./
deploy-site: runs-on: ubuntu-latest steps:
  - uses: actions/checkout@v2
  - uses: jakejarvis/s3-sync-action@master
    with:
      args: --delete
    env:
      AWS_S3_BUCKET: ronit-demo-site
      AWS_ACCESS_KEY_ID: ${{ secrets.AWS_ACCESS_KEY_ID }}
      AWS_SECRET_ACCESS_KEY: ${{ secrets.AWS_SECRET_ACCESS_KEY }}
      SOURCE_DIR: ./resume-site
 - Push this repository to GitHub and at first it will throw error. Because the Secrets are not stored in the github repository. Add the secrets to the repository as shown below:

<img width="1312" alt="Screenshot 2022-07-07 at 2 06 30 PM" src="https://user-images.githubusercontent.com/91361382/177730012-81166847-f9b6-4719-a8e5-48259fa4fd40.png">

**Re-run the jobs from GitHub Actions**

<img width="1435" alt="Screenshot 2022-07-07 at 2 18 36 PM" src="https://user-images.githubusercontent.com/91361382/177732535-c1cf996f-5b16-4aa4-a74a-1ec8c225f00f.png">

This time it will be successfully executed !

So, Finally the Cloud Resume Challenge comes to an end from ```Day-2``` --> ```Day-10
Our end Product of the Project is https://ronitbanerjee.xyz
And here is the Codebase in GitHub Repository
Social Proof

Thank you for reading till the end. And I hope you successfully completed the challenge and ended up with an amazing project!
Follow me on Twitter, LinkedIn and GitHub for more amazing blogs about Cloud, DevOps and More !
About the author
Building ProjectX.Cloud | GSoC'23 @ DBpedia | DevOps & Cloud Computing
Comments
Join the discussionNo comments yet. Be the first to comment.